TLIP0000564_0086649

Capturing 12-bit Uncompressed 4:4:4 with the Sony F35

Ever since I began shooting with the Sony F35, my hope was to record its 12bit 444 uncompressed signal to access all the data the camera was capable of delivering. With the solution below, there are no more limits to capturing every subtle color the amazing Sony/Panavision CCD chip is capable of discerning. The combination of a 12-bit 4:4:4 originated file, coupled with S-Log gamma and S Gamut color space gives us the ability to capture a reasonably sized digital negative that is every bit as good as raw, with minimal processing overhead during post production.

The Existing Market

12bit recording options for the F35 had been…

1. Sony SR-R1 (big/reliable/expensive/power hungry)
a ‘monitor-less’ fairly sizable stand alone recorder (4k+) that writes to very expensive media (3-5k), and requires a proprietary transfer station (~1k). The 12bit signal is recorded to a flavor of Sony’s proprietary SR format @ 800Mb/s. Marketing specs touted an uncompressed DPX option for the recorder, but it was never released.

2. Codex (big/reliable/very expensive)
an even more expensive solution (5k+), that offers uncompressed 12 bit, but also requires a proprietary transfer station (10k+) which is twice as expensive as the recorder. While the recording media is rock solid, it’s equally bulky, proprietary, and expensive.

3. Sound Devices (small/storage slightly less reliable/economical/not uncompressed)
makes a small 12bit 444 recorder that records to economical common media. It needs a multiplexer to convert the F35’s dual stream HD-SDI to single cable 3G-SDI, and records to space saving 12bit 4444 Pro Res, but if opting to use an F35 in the first place, my preference is to record completely uncompressed so artists aren’t limited by ProRes compression artifacts while doing VFX or compositing work.

Ultimately, I wasn’t a fan of the options above due to their bulk, expense, power consumption, or compression schemes. In the end, the Gemini 444 became my recorder of choice, due to its small form factor, low power consumption (6 to 8 watts), fault tolerant media, and its ability to record to compressed DNxHD. (Unfortunately, the DNxHD codec option was vaporware, a marketing feature shown on multiple spec lists, that sadly never came to fruition on the Gemini). In the past, the combination of Gemini & F35 have been limited to 10-bit, which looks great, but recording in 12-bit provides even more levels of luminance (4096 per channel vs 1024), and translates to even smoother tones when stretching out those gamma curves.

Gemini – The 12 bit Capable Recorder

The Gemini was advertised as a 12-bit recorder, but its ability to capture a 12-bit signal was primarily tested on the Canon C500. Out of the box, it did not recognize Sony’s 12 bit signal.

After testing every combination and permutation of signals imaginable between the two devices, I realized the recorder didn’t sync with Sony’s particular 12-bit PsF scheme. The Gemini displayed the camera’s 12-bit signal on the monitor, but refused to record it. After communicating with Convergent Designs through email about the issue they made a note of it, but it didn’t seem like any new firmware releases were on the horizon due to their heavy development resources on the Odyssey. I held onto the hope that they would one day update the Gemini firmware to recognize Sony’s PsF signal, sadly they discontinued development this past year and moved all of their resources onto full time development of the Odyssey. This meant the 12 bit PsF issue on the Gemini would never be addressed in firmware, nor would DNxHD ever exist for the Gemini. The same 12bit PsF issue permeates the Odyssey recorder, but as the F35 market is quite small, I don’t hold much hope that the PsF issue will be addressed in their software at this point.

The Solution

For some reason, I still felt that recording a 12-bit signal from an F35 on the Gemini was possible (if the signal was converted or re-timed to SMPTE 424 3G single link.) I played with different brands of multiplexers in hopes of serving up a progressive signal the Gemini would record. After about a year of testing multiple brands of multiplexing devices, and waiting for technology to advance, I finally found ONE device…

The AJA LUT box. 🙂

AJA_lutbox

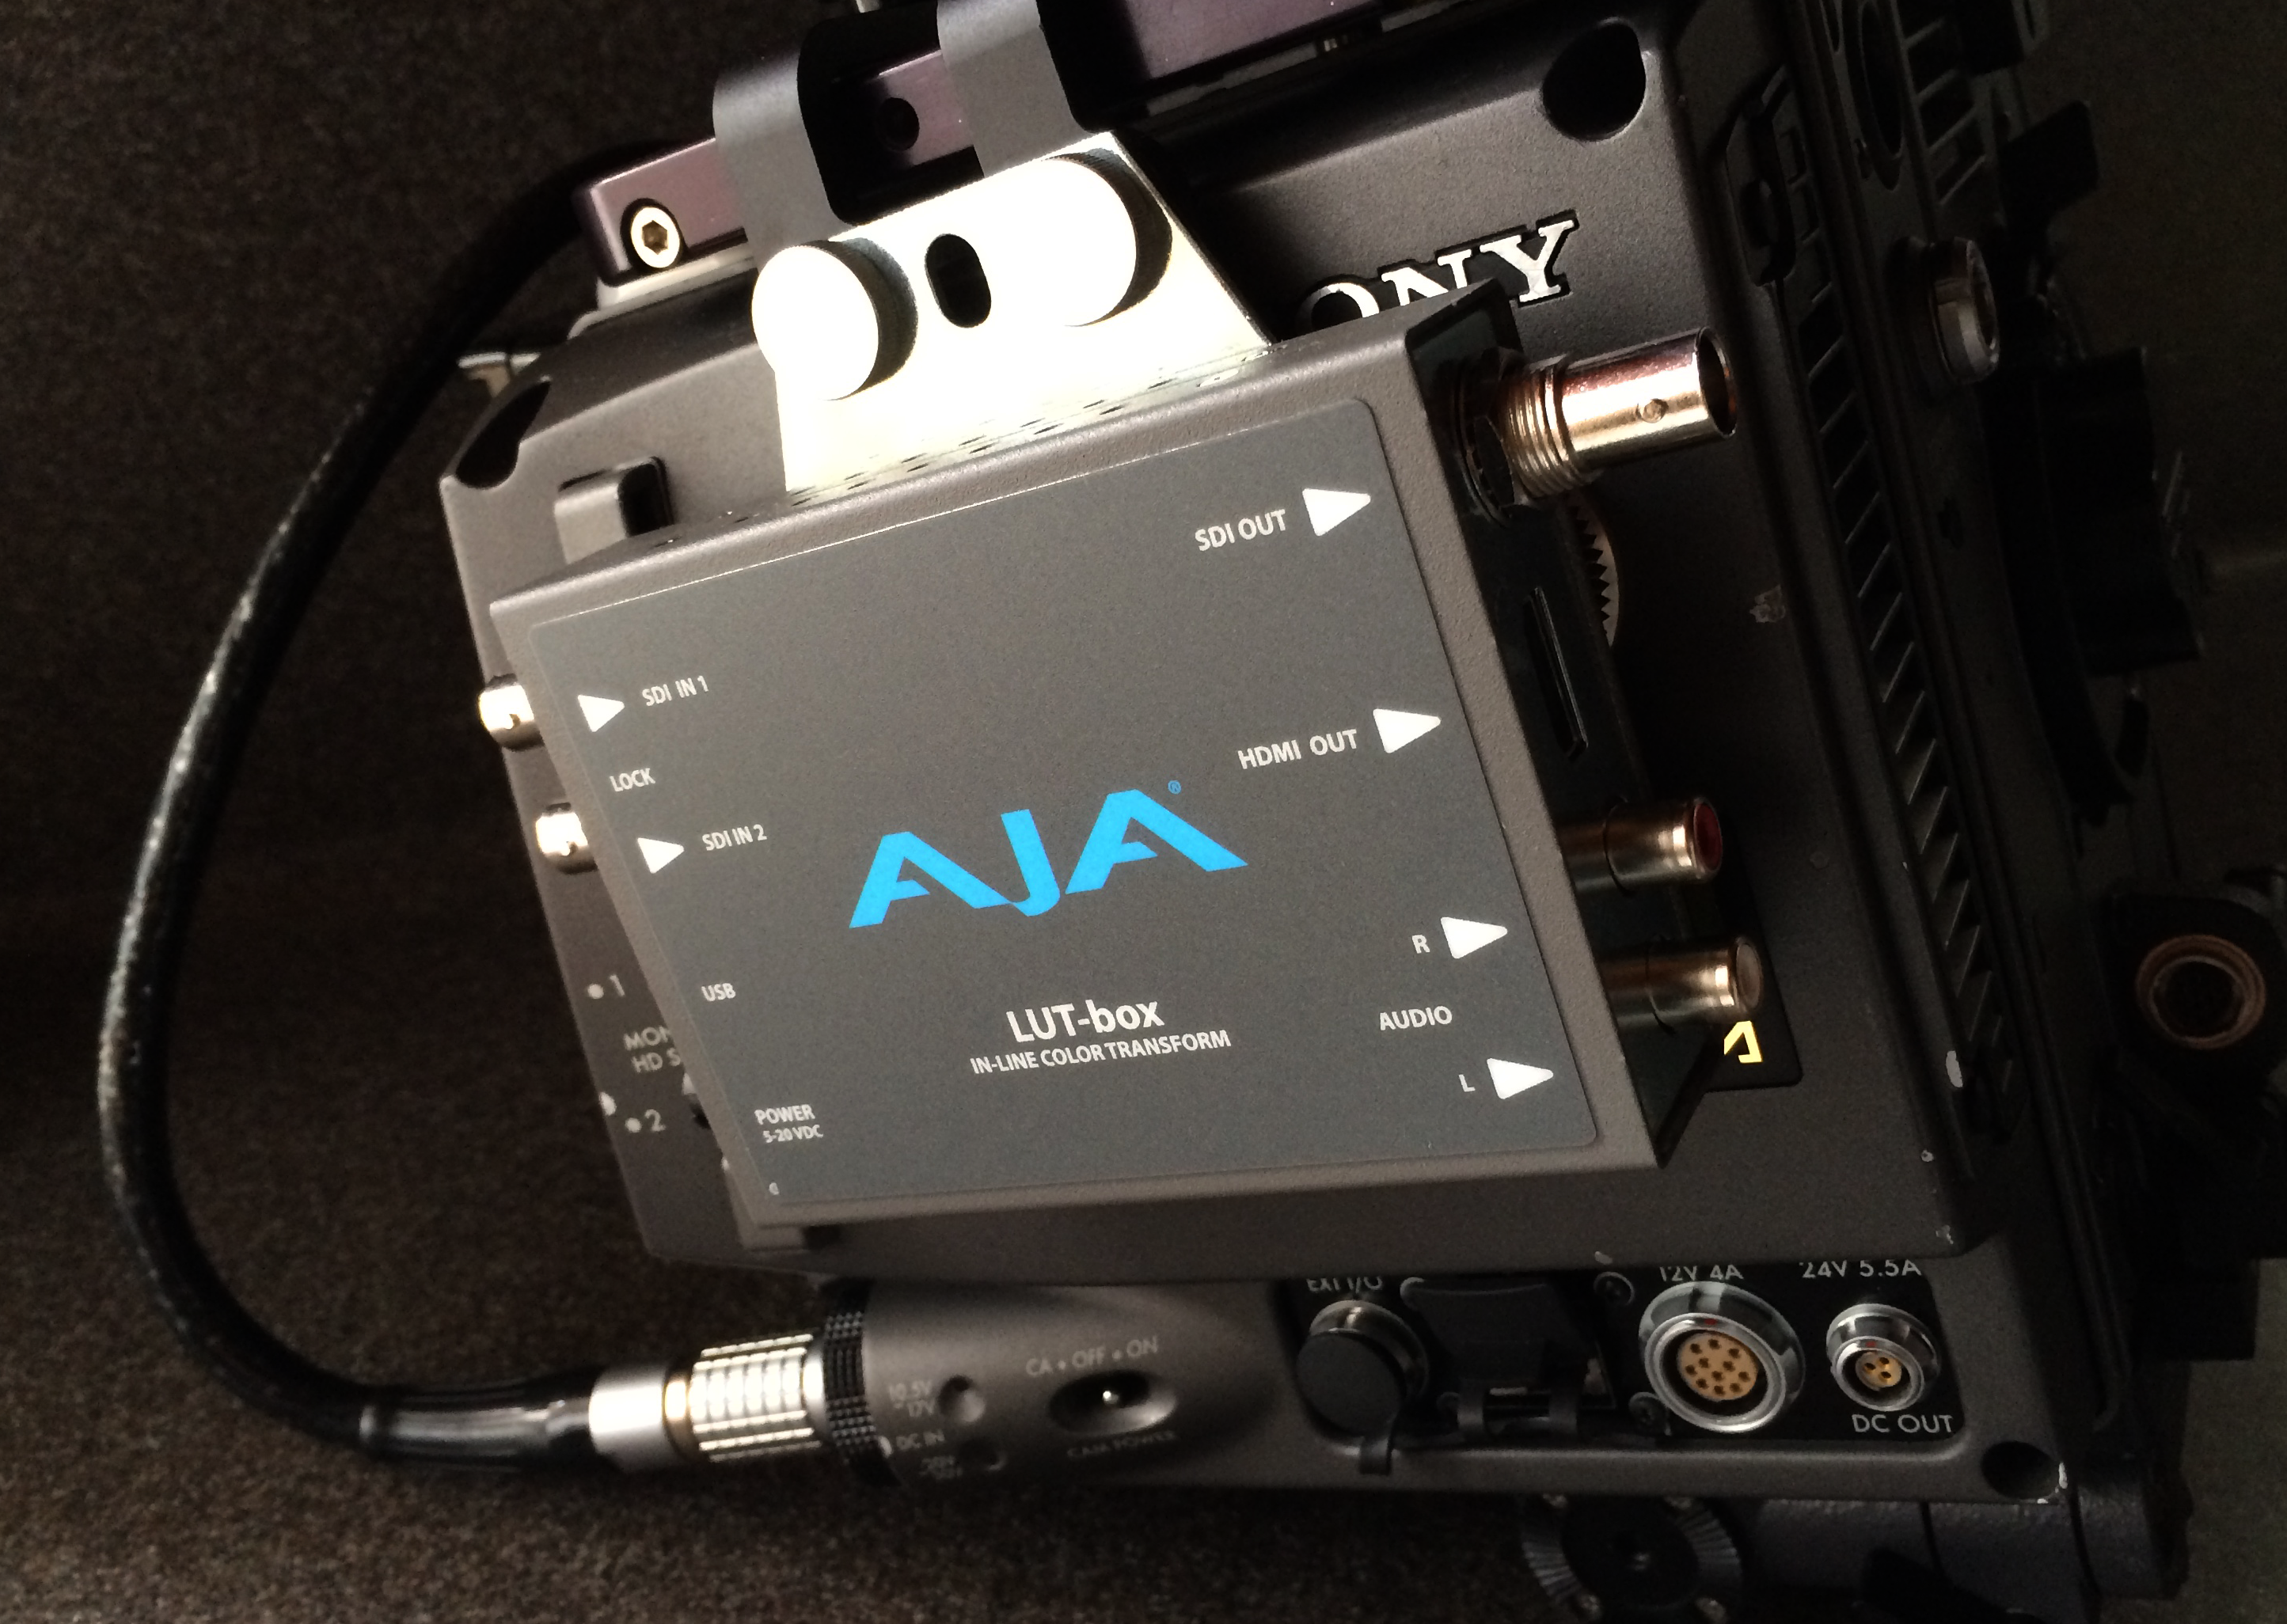
It recognizes the F35’s dual link 12bit PsF signal, and converts it to a single link 3G 12bit Progressive signal that the Gemini can recognize!

F35 + AJA LUT box + Gemini = 12bit 444 in full uncompressed glory!

This combination allows us to record the best imagery the camera has to offer while retaining a small and efficient form factor. Coupling a used Gemini + AJA LUT box, allows us to forego multi-thousand dollar SR data modules or Codex mags. Media transfer also becomes a breeze with cheap Seagate USB3 or Thunderbolt transfer shuttles. While the Gemini is discontinued, the bonus is that all the major software/producion kinks have been worked out at this point. While this solution still costs a couple thousand, it provides a cheap alternative to Alexa that yields a picture that is no less stunning. The only limitation for capturing great imagery is your own imagination for story telling.

Final Thoughts

Six years after the F35’s initial launch, it’s nice to know that capturing a full 12bit uncompressed signal (from arguably the best CCD technology offered to date), only requires the use of two small devices that together weigh no more than a couple pounds. No more large, unwieldy, power hungry recorder boxes.

While the introduction of the Arri Alexa shortened the F35’s production window, my hope is that the two items above will give the F35 an even longer life. With its increased color sensitivity, the F35 definitely holds its own against Alexas and REDs. Like a Pioneer Kuro, vacuum tubes, or motion picture film, there are technologies that don’t scale to mass production or mass consumption. 250 thousand dollar cameras, 7 thousand dollar plasmas, and 1000 foot film magazines are going the way the dodo bird, BUT this doesn’t mean CCD technology, plasma, film technologies are any less powerful, just less cost effective in making a profit, or less scalable given consumer’s ever increasing desires. While I like to tinker with new & cheap tech, I still relish in the fact that Sony and Panavision created an unparalleled CCD chip that still holds up well against modern day sensors. The fact that the F35 has comparable imagery so many years later is a testament to Sony’s great engineering and Panavision’s elegant sensor design.

Attached are a couple uncompressed DPXs for you to play with…
DPX 12bit test

Prism

Sony F35 ACES workflow

I always wanted to utilize an ACES workflow with the F35 Camera, but attempting to re-create a workflow for a camera that was popular 5 years ago with economical off-the-shelf software was like a needle in a haystack… Existing grading software that utilized proper F35 IDTs cost many thousands of dollars, and newer software skipped this particular camera, only including IDTs for the F65, and F55.

Why bother with ACES?

Because it maps the color of each camera to achieve consistency amongst various brands and allows for closer seamless integration of CG elements. By utilizing an image device transform (IDT), ACES removes the secret sauce/color science of each camera manufacturer (meant to hide the deficiencies of each), and transforms and linearizes the data/light captured from the imaging device without losing any information.

In the purest sense, an IDT maps what the sensor data captured into a distinct, discreet numbers that correlate to the predefined ACES color workspace (which encompasses more than our eyes can see). In order to utilize ACES correctly, it requires the use of an IDT (image device transform) to properly map the camera’s luminance values, a reference rendering transform (RRT), and output device transfrom (ODT), eg. our monitor or projector. Without them, we’re just doing random transformations without a common baseline.

My search for a usable implementation of the F35 IDT led me through a deep rabbit hole where I downloaded random Japanese software from Sony & played with outdated rudimentary cineon and rec709 luts. 1D LUTs are a great intermediary step, and I still wanted to use them in the offline stage, but I felt they were ultimately destructive to the data in the grading stage. My search ultimately led me to a simple solution that uses After Effects, OCIO, and LUT Buddy.  Hopefully this blog saves you the headache I went through to find a low cost/workable ACES solution for this amazing camera…

The Goal

My original goal was to create a render-less editing workflow that allowed me to apply a proper 3D LUT /log dailies transform to uncompressed log DPX files in Premiere (Sort of a one-box solution with final output through After Effects.) Using an SSD/Thunderbolt setup, I wanted to edit with the original files and eliminate the need to create dailies or have the option of changing them at any given time. I also wanted workflow that took me straight to finishing without excessive roundtripping. This process still requires rendering in the timeline, but allows us to utilize the same original log files throughout the entire process (and avoids those strange gamma shifts when using formats like ProRes.) I am able to output in 10bit from Premiere using 3D LUTS if I’m in a rush or I can proceed to finish in After Effects in full 32bit floating point.

The Method

It starts with After Effects, and you will need to download the free plug-ins listed at the bottom of this page.
Option 1: apply IDT transform using OCIO, create dailies LUT that removes the log and maps all the S-Log values accordingly.
Option 2: apply IDT transform, grade using Colorista plug-in, output a graded LUT that we can use for offline editing.

The process is pretty basic,
apply LUT Buddy effect to desired clip,
select a ‘Draw Pattern’
pattern: (3D 32)
(This will read the original RGB data that is baked into the file, before transformations)
add OCIO effect to same clip, click on ‘convert’ button, change settings to:
(configuration: aces)
(input: slogF35)
(output: aces)
add second OCIO effect to clip, this time click on ‘display’ button, change settings to:
(input: aces)
(transform: RRT)
(device: sRGB)
(OPTION2: add Colorista effect or perform additional grading if needed
apply additional LUT Buddy effect to clip, select ‘Read Pattern’
pattern: (3D 32)
click ‘Options…’ menu s
select ‘Export LUT’, for file format select Apple Color (.mga)

Apply the mga. LUT to clips in Premiere for an offline LUT.

OCIO becomes our ACES foundation for any grading in After Effects.

Overall Finishing Pipeline

DPX > load single clip to AE > create dailies LUT

Apply dailies LUT to DPX footage  in Premiere > Dynamic Link > AE

Finish in AE (ACES), track, composite, etc…

General notes:

Make sure to set up working space in After Effects to 32bits per channel.
In order to playback uncompressed DPX files you need a disk subsystem capable of +350MB/s (at 24fps the computer is moving 200MB/s, not including audio)

Why go to the trouble of doing this?  What are the Benefits?

1. The proper gamma transform for F35 footage gives us solid a neutral reference to begin the grading process . White point, black point and gamma RGB, are properly mapped according to the camera’s S-Log spec.
2. Once the proper F35 IDT is applied, the footage needs fewer adjustments and color transformations to make it look good. If you’re capturing the footage as intended by the S-Log spec the footage should look pretty good, requiring minimal grading to get the image looking good/right.
3. It’s a simple, free solution that runs on slightly older mac computers if you have fast drives.
4. To my eye, the ACES mapping in After Effects gives the skin tones a more natural look than starting from scratch or using a basic LUT, and also allows us to use the full power of After Effects 32bit floating point pipeline.
5. No longer have to commit to baking in a LUT onto dailies footage or have multiple sets of original files. I love the latitude of working with uncompressed 2K files which allows me to do more things in one box without excessive round-tripping.
6. Allows ability to test different LUTs or grades while editing in Premiere.
7. LUTs created easily translate to other finishing programs allowing us to work with elements from different apps and be assured that color/gamma is consistent across them all.

Software you will need to download:

OpenColor IO for After Effects
http://fnordware.blogspot.com/2012/05/opencolorio-for-after-effects.html
This plug-in is the missing link for obtaining a working F35 IDT! That you Brendan! OpenColorIO is Sony’s solution for color management. It’s a very smart way in dealing with color in scene linear. OCIO is how the big boys like Sony Imageworks deal with color. It removes all our problems associated with the different gammas of quicktime and ProRes… Color matches from app to app.

DPX Plus
Free plug-in that allows us to read all flavors of DPX in Premiere and After Effects…
http://fnordware.blogspot.com/2012/06/dpx-plus.html
(Brendan also makes other awesome plug-ins that are really valuable for VFX pipelines. Check out his EXR plug-in. EXR is a great file format created by the godfather of visual effects ILM.  EXR is the go-to file format for most finishing pipelines because of its openness and expandability.

LUT Buddy for Premiere, LUT Buddy for AE
http://www.redgiant.com/products/all/lut-buddy/
This plug-in reads and creates look up tables. It’s free and allows us import 3D LUTs into Premiere, apply to clips in one fell swoop. It gives us the option to output 10bit color quickly from Premiere, or move back to a 32bit floating point color pipeline for finishing in AE. The demo of the software suite should include a copy of LUT Buddy.

Sony F35 Camera Mojo
With the early R&D help of Panavision, Sony used its sizable resources to develop an amazing CCD chip that captured a color gamut wider than film. It’s basically one of the first and last ccd’s made in the S35mm size before the CMOS fabrication process became mainstream. The red, green and blue dyes on the F35 CCD were some of the most accurate of their day, but it made the chip very expensive to produce. Color science is a big thing on this camera, and short of the F65 or maybe the latest Alexa,  I feel few cameras capture better color. The F35 CCD is natively balanced to a color temperature of 3200K so the sweet spot for the sensor is based on standard tungsten lighting, skin tones and warm sources look great. Most CMOS silicon chips today have a native color temperature of 5000K. So while many CMOS chips are great at capturing the blue sky and daylight, they tend to be a little more deficient or clinical when it comes to skin tones. While we can pump up the deficiencies with grading, it’s one of the few cameras that capture full resolution RGB color data per its output resolution.  I hope this blog entry can help shift back our conversation to capturing and translating color tonality & dynamic range, the true hallmarks of S35mm film. While newer camera have great resolution, and bring out every wrinkle, crease, or imperfection, I would like to say that the motion pictures we saw in the past 50 years never resolved much beyond 2K by the time they were projected in theaters (IMAX notwithstanding).  So even after five years this camera still captures great tonality, and offers a similar creamy, luscious look that we loved with film.